JD 440 ID Continued...
I separated all the housings from the engine back. I replaced what seems like all the seals and cleaned out all the goop from the housings. I replaced a few of the worn bearings in the transmission. I replaced the clutch and serviced the directional reverser and had to weld up one of the shift collars and fit it. At this point all the housings are re-assembled. New brakes are installed and adjusted. I cleaned smaller parts and primed when weather permitted.
I had the wheels on it to roll it out and clean it. Took a few baths to get her clean. I have it mostly clean up to the engine. I need to do some work on the front end so I will clean and get that part painted once things are put together. Much of the back half was rusted and bare metal so I wanted to get it primed and painted while it was clean and we had some nice weather. Took the wheels back off to paint hubs and housings. The color I went with is a School Bus yellow that I bought from Tractor Supply (Paint Details). It calls for a Majic Reducer for spray but I found a 10:1 ratio of Acetone works well.
Up next
I broke the bolt inside a stud where the radiator mounts so I need to remove that. I need to put the mounts into the brackets for the radiator (I purchased new ones of those and they are just the rubber parts). I bought new belts so I will be putting those on and mounting the alternator and power steering pump. I have new hose for the radiator and I need to pick up some hose for the water pump. I have the oil pan gasket and need to put on a new valve cover gasket.
Here are pictures of the project:
John Deere 440id Photo Album
Sunday, March 1, 2015
Monday, February 23, 2015
John Deere - JD440id Part 1
At the end of 2014 I had an opportunity to tear into the John Deere Backhoe that I purchased around a year ago. As a reminder, the clutch was clearly slipping as it would mostly only drive around in 1st gear. This made the Directional Reverser useful since it was used to get the tractor to move in reverse (leverage 1st gear ratio to drive). In the tear down I will talk more about some issues with the reverser that I found.
Here is a pic of the brackets. The bottom ones are hooks:

I ordered a long list of parts. As I removed things I would put anything broken in a basket and made sure to order those. Each day I would update a spreadsheet with the parts based on what I removed and the parts assemblies in the manual.
Air Intake Elbow: Mine had a repair attempted it seems. That did not hold up. I found a 3 x 2 1/2 PVC Reducer will help you adapt from the blower to the pipe that comes from the cleaner.
Directional Reverser anything: My shift collar is broken and will need to be brazed. I was unable to locate one or a cross reference part even that would work.
Directional Reverser Housing: Type A ATF. These are wet clutches and the manual actually specified this type of fluid. This related to a Dexron ATF Fluid. My local NAPA dealer was helpful in explaining all the differences.
Final Drive: I settled on a SAE 90 gear oil here. The oil is shared between the transmission and the differential housing. I am in FL so heat is more of a concern than cold here so I wanted a thicker fluid so it would try to stay in and not sneak past seals and gaskets when it's 98 degrees outside.
Remove the Backhoe
To remove the Backhoe remove the bolts at the lower part of the bracket (there is a bar that crosses which I believe is to protect the hoses) and tap out the pins at the top of the bracket. The trick here I wish I knew was that the brackets have hooks at the bottom. I placed the bucket and book all the way extended out and on the ground. The backhoe needs to be lifted up (keep the hoses connected for this and you can use the stabilizer feet) and then drive the tractor forward. There are sleeves that would allow you to remove the backhoe brackets (left and right) from the front loader brackets but those are really frozen into mine so I will need to press them out.Here is a pic of the brackets. The bottom ones are hooks:
Remove the Front Loader
To remove the front loader I first removed the arms and bucket part. Obviously you have to disconnect fluid lines. I pulled the pins from the uprights and lift cylinders. With that removed I was able to remove each side independently. This will not drop off. You have to remove the arms from the front grill part. There are 2 bolts which hold a pin into a cup in the grill. Mine were rusted in there good so we used the Ford 8N and a chain, a 2 lb hammer and plenty of liquid wrench penetrating stuff. They eventually popped off. I will be cleaning these and applying something to prevent them from rusting in again. Once these are removed the bolts in the back can be removed and the assemblies will drop down. I had to lean mine out and removed the wheels and tires to get them out. They are heavy, especially since I couldn't take the backhoe brackets off.Remove Everything!
Now the fun part. I basically just started removing everything. I had to use a heavy duty impact gun for some of the bolts. You'll need some big sockets. One of the wheel hubs was tough to remove and the other would have fallen off. I had to purchase a new hub and will be doing some work on the axle to make it match the right side one.I ordered a long list of parts. As I removed things I would put anything broken in a basket and made sure to order those. Each day I would update a spreadsheet with the parts based on what I removed and the parts assemblies in the manual.
Tough to find Parts
Some of the parts were hard to track down. Be sure to download and print the parts manual and that will certainly help. The parts will span many models so the suppliers and sites I found often had them under a different model but the part numbers matched.Air Intake Elbow: Mine had a repair attempted it seems. That did not hold up. I found a 3 x 2 1/2 PVC Reducer will help you adapt from the blower to the pipe that comes from the cleaner.
Directional Reverser anything: My shift collar is broken and will need to be brazed. I was unable to locate one or a cross reference part even that would work.
Fluids
I did some digging to find out what fluids I should use. Here is what I settled on. There is plenty of debate here so I'll outline why I chose these types.Directional Reverser Housing: Type A ATF. These are wet clutches and the manual actually specified this type of fluid. This related to a Dexron ATF Fluid. My local NAPA dealer was helpful in explaining all the differences.
Final Drive: I settled on a SAE 90 gear oil here. The oil is shared between the transmission and the differential housing. I am in FL so heat is more of a concern than cold here so I wanted a thicker fluid so it would try to stay in and not sneak past seals and gaskets when it's 98 degrees outside.


Tuesday, January 6, 2015
Ford 8n Hydraulics Rebuild and Brakes
At the end of 2014 I had some time off from work so I decided to break into the Ford 8n and fix the brakes and lift cylinder. I removed all the top end of the lift assembly and had to replace the follower pin that rides on the cam for the float control. Spoiler alert: despite my best efforts at tightening stuff up, I still can't properly use the float control with the float lever in the down position. I also replaced the PTO shaft seal while I had it torn down and the fluid drained out.
Hydraulic Repairs
I had the most common problem with my lift arms. They would lift fine but would quickly drift down. With a scoop bucket of dirt I could hardly get it dumped before I wouldn't have enough clearance. That's after stopping, putting it in neutral and dropping the lift control and picking it back up. I also had an issue with adjustment where I was not able to work the control lever in the range and had to leave the top bolt out to run the control lever way past the top.I removed the seat and top top cover based on a video I saw on you tube. I replaced the friction pad, control lever bracket (it's cast aluminum so it didn't come off in one piece) and a few other parts. Added in some washers to tighten up the internal linkage and replaced the piston and cylinder. I went with the rubber o-ring style piston instead of the original steel rings. Something had broke in there at some point and some pieces of steel wore deep grooves in the cylinder and piston/rings. The pump had been replaced at some point which is likely from a major breakage in the transmission housing. I inspected most of that but did not replace anything there. Bought a 5 gal bucket of mineral oil from Napa and was on my way to lifting things and holding them up.
Brakes
One of the brake drums was badly damaged as a result of the pads being worn completely away and the steel scrubbing on the drum. Had to order a new one of those along with the shoes. I did replace the brake springs. I was missing a spring, the left side gets an extra spring. I should have taken pictures and videos of assembly but I was anxious to get it put together. I replaced the felt dust seals and rear axle seals while I had it all apart.Videos
Here are some poorly narrated videos of the project. Pardon the mess in the shop, it's still getting settled.https://www.youtube.com/watch?v=yM6Uf94UU-w
https://www.youtube.com/watch?v=WjGzCceSo-8
Monday, March 10, 2014
John Deere 440ID
I finally have a little free time so here is an update. This past January I purchased a John Deere 440ID with the Model 71 Loader and Model 52 Backhoe. The serial number plate is missing so the best I can guess is that it's around a 1960. This is based on a little research and some details found on Johnny Popper. It's a 5 speed but the clutch is bad. It had a broken fitting and some bad hydraulic hoses on the loader and we lost most of the fluid getting it loaded on the trailer. It's heavy, no kidding. We needed it a little farther forward so it was a slow ride home. Anything over 25 or so MPH had the tail of the truck swaying. Needed a little more tongue weight.

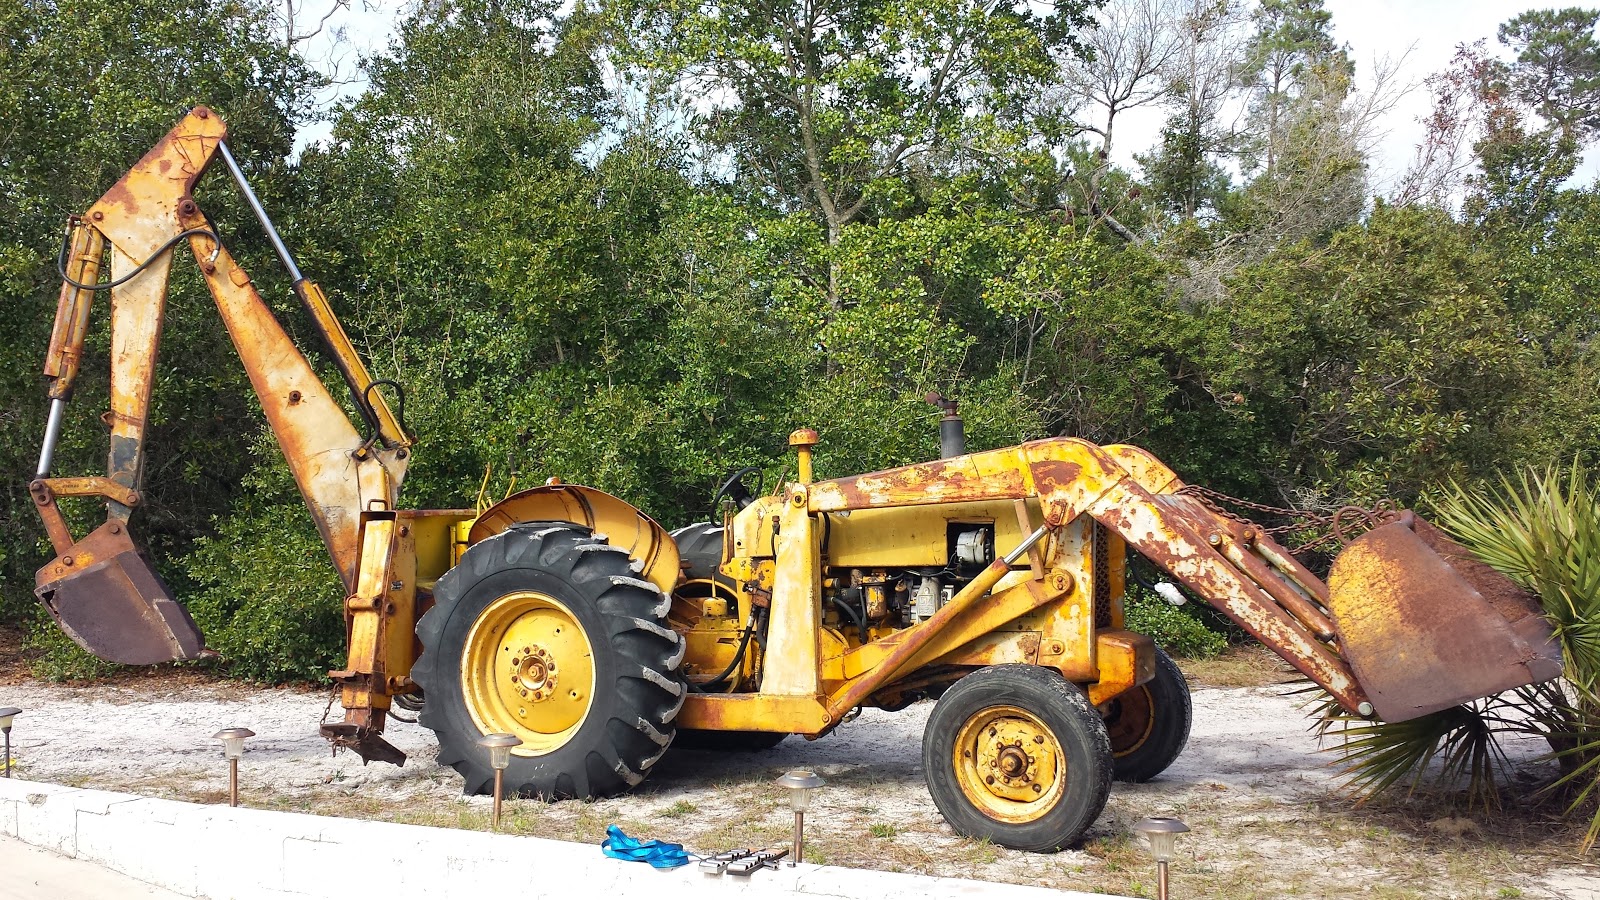
Progress so far...
I added in some fluid recently and dug a hole with the backhoe. I added 43 Hydraulic oil since I new it was an old beast and since I live in Florida, cold is not an issue. This was before I got the manual which says to just use regular oil in case anyone is wondering. I recently bought the manual for the backhoe so if you have any questions please feel free to reach out.
It worked well and was really fun. It has a bad cylinder on the crowd. Bucket and boom are really strong. Right stabilizer leaks bad and the valve leaks so I am guessing there will some seals and rebuilds to get all that cleaned up.
 Loader was getting air in the system but no leaks as I worked out the air. I suspect the filter in the reservoir is pretty dirty and it's only drawing fluid off the top.
I changed the oil and tracked down a wix filter. I found these listed but the message board has some comments addressing the fit for some:
JD 440 ICD
Fuel filter: Wix 3513
Oil filter: Wix 51100 (GM 1100)
Source: http://www.jdcrawlers.com/messageboard/viewtopic.php?t=6927&sid=62a1851067c05fd20d963a8a802ea468
Motor sounds great, it cold starts hard though. Once it's warm it fires right up. Its the GM 2-53 2 cycle Detroit Diesel. 2 Stroke with a super-charger has a very unique sound I will tell you.
Clutch is non-existent. I have to move it around with the directional-reverser. For anyone interested, I have to put it in the reverse position and then put it in reverse to go forward and 1st gear to back up. I think the clutches in there are shot too so I am planning a rebuilt and tranny overhaul (where needed) once I have the backhoe and loader off.
Brakes are bad. I can't tell is something is wrong mechanically since one is stuck and the other just doesn't seem to slow this beast down much. They are easy to get to so I will just check them out and probably just order the pads when I order the clutches.
That's all for now. The wife and I just had a baby so this is on hold for a little bit but I am anxious.
Progress so far...
I added in some fluid recently and dug a hole with the backhoe. I added 43 Hydraulic oil since I new it was an old beast and since I live in Florida, cold is not an issue. This was before I got the manual which says to just use regular oil in case anyone is wondering. I recently bought the manual for the backhoe so if you have any questions please feel free to reach out.
It worked well and was really fun. It has a bad cylinder on the crowd. Bucket and boom are really strong. Right stabilizer leaks bad and the valve leaks so I am guessing there will some seals and rebuilds to get all that cleaned up.
I changed the oil and tracked down a wix filter. I found these listed but the message board has some comments addressing the fit for some:
JD 440 ICD
Fuel filter: Wix 3513
Oil filter: Wix 51100 (GM 1100)
Source: http://www.jdcrawlers.com/messageboard/viewtopic.php?t=6927&sid=62a1851067c05fd20d963a8a802ea468
Motor sounds great, it cold starts hard though. Once it's warm it fires right up. Its the GM 2-53 2 cycle Detroit Diesel. 2 Stroke with a super-charger has a very unique sound I will tell you.
Clutch is non-existent. I have to move it around with the directional-reverser. For anyone interested, I have to put it in the reverse position and then put it in reverse to go forward and 1st gear to back up. I think the clutches in there are shot too so I am planning a rebuilt and tranny overhaul (where needed) once I have the backhoe and loader off.
Brakes are bad. I can't tell is something is wrong mechanically since one is stuck and the other just doesn't seem to slow this beast down much. They are easy to get to so I will just check them out and probably just order the pads when I order the clutches.
That's all for now. The wife and I just had a baby so this is on hold for a little bit but I am anxious.
Blog Update for 2014!
I bought a Backhoe Loader so I thought it would be good to change the name here. I will use the same blog to post my Ford 8N projects and the JD 440ID details. I am also planning on including some info on attachments here as well. Please reach out to me with any questions you have about the tractors or attachments.
Friday, January 4, 2013
Ford 8n at Work and Attachment List
I thought I would add in a little about what I have been getting into
around the property with the old girl. My daughter just turned 1 so I
cleared and graded a nature trail for her. I have been maintaining the
road and moving dirt around with a scoop bucket. I removed some invasive vines that had killed all the other trees and plants with the root rake. Most of the time I just look for things to do just to get out of the office and out on the tractor. I haven't started on any gardens or anything yet...that will probably be this growing season.
Right now my dad and I are sharing most attachments until I start bringing some home. Here is a list of what we have (operational). I would be interested in hearing what others have outside of this list that they find very useful...
Upgrades/Fixes I will need to get into soon...
Right now my dad and I are sharing most attachments until I start bringing some home. Here is a list of what we have (operational). I would be interested in hearing what others have outside of this list that they find very useful...
- Scoop Bucket (loving this one to fill in a hole from a pool that has been removed)
- 2 Scraper Blades (one came with my tractor so it's the only attachment I have)
- Box Blade with teeth
- Root Rake (not the thin rake fingers style)
- Boom
- Bush Hog
- Finish Mower
- 1 Bottom Plow
- Middle Buster
- Disc
- Roto-tiller
Upgrades/Fixes I will need to get into soon...
- New Tires
- Hydraulic Piston Rebuild
- Rear Axle Seals
- Clean gear oil off brakes and new pads
- PTO Shaft Seal
Thursday, January 3, 2013
Fixing Lift Arms
So I should have been more careful...that part is obvious. There is a steel bar on the outside of the left lift arm. I took an attachment off and the wire I had tied and wrapped around the 2 arms broke. In about 1/10 of a second the bar is up in the fender. Not good. A few mins on the shop press and it was better than before (was a little bent when I brought her home). So I added a few things I had laying in the shop to help out and made some not-so-original modifications so the lift arms would stay out of the tires. It has helped.
Adding new parts - Alternator and Lights!
So I just finished installing an old Delco alternator from an old Cadillac. It charges so that was great. I used some old brackets and welded up a mounting bracket for the alternator. I created the top bar from some old conduit with some fancy offset bends. Works great. Have it all wired up. Check here for great wiring instructions:
http://www.myfordtractors.com/12volt.shtml
I added lights and a switch so we are ready to deal with it getting dark around 5:30/6pm. Thanks to Jason and my mother-in-law for the Christmas gifts, some fancy lights from Just8ns and Amazon. I used the ones from Just8ns for the fronts even though I think they are the rear lamps. The other was a generic 12v worklamp so I mounted that in the back. Still need to sort out a ground issue on that lamp.
Also, dad had an Ammeter in a box so I have a nice illuminated Ammeter in the dash. I will try to upload pics soon of all the new additions.
Sponsored Ad
http://www.myfordtractors.com/12volt.shtml
I added lights and a switch so we are ready to deal with it getting dark around 5:30/6pm. Thanks to Jason and my mother-in-law for the Christmas gifts, some fancy lights from Just8ns and Amazon. I used the ones from Just8ns for the fronts even though I think they are the rear lamps. The other was a generic 12v worklamp so I mounted that in the back. Still need to sort out a ground issue on that lamp.
Also, dad had an Ammeter in a box so I have a nice illuminated Ammeter in the dash. I will try to upload pics soon of all the new additions.
Sponsored Ad
Needs New Engine
It has been far too long since an update. Here is the story.
Machine shop found cracks in the block where the valves seat so it was basically a lost cause. I looked at ordering a new block and rebuild kit and the blocks are hard to find. I finally decided to pony up the money for a fully assembled engine. I purchased one from http://www.waltstractors.com and it arrived on a pallet. A few complaints I have. Some of the head bolts leaked coolant onto the head. it would pool in the little dips. Walt offered to send new bolts but the head bolts were longer and have stopped leaking so I didn't take them up on the offer. Also the paint used on the head was not high temp and is all peeling off.
Bolted up my new engine and fired it up. Starts easy and runs great. No more smoke so that is a great thing.
I have all my old parts and I am looking to sell them. The head was machined already and is in really good shape. Be sure to check out the parts page to take a look.
Parts for Sale
Machine shop found cracks in the block where the valves seat so it was basically a lost cause. I looked at ordering a new block and rebuild kit and the blocks are hard to find. I finally decided to pony up the money for a fully assembled engine. I purchased one from http://www.waltstractors.com and it arrived on a pallet. A few complaints I have. Some of the head bolts leaked coolant onto the head. it would pool in the little dips. Walt offered to send new bolts but the head bolts were longer and have stopped leaking so I didn't take them up on the offer. Also the paint used on the head was not high temp and is all peeling off.
Bolted up my new engine and fired it up. Starts easy and runs great. No more smoke so that is a great thing.
I have all my old parts and I am looking to sell them. The head was machined already and is in really good shape. Be sure to check out the parts page to take a look.
Parts for Sale
Time to Tear it Down...
Well, although I did get some projects around the property done with the tractor despite it's bad smoking habits, it was time to tear down and fix the problem. If anyone has the manual, it is amazing how quickly you can separate the engine from the transmission on these. You can pull the pins in one of the front axle bars and fold the front tires aside. I opted to remove the whole front end and roll it out of the way.
There was considerable piston movement so they are worn out. We pulled the caps and the main bearings don't look that bad. Everything looks like it has been serviced before. Most parts are marked with .010
The clutch doesn't seem bad, the ring gear is missing some teeth from when the starter must have bound up. I also found chunks of the starter bushing in there. Will need to order a new one of those as well. Off to the machine shop...
There was considerable piston movement so they are worn out. We pulled the caps and the main bearings don't look that bad. Everything looks like it has been serviced before. Most parts are marked with .010
The clutch doesn't seem bad, the ring gear is missing some teeth from when the starter must have bound up. I also found chunks of the starter bushing in there. Will need to order a new one of those as well. Off to the machine shop...
Tuesday, December 27, 2011
Smoking...Test Some Additives
The 8N has been doing some work around the yard. I traded an old straight pipe which ran under the tractor for one that aims up. The tractor had a minor miss on one cylinder which got much worse the more I ran it. I have been testing additives just to see if they have any effect on it (I expect they wouldn't but the tractor seemed like a perfect test subject since I am rebuilding it soon).
The first additive I tried was SeaFoam. Since it only took half the can to treat the oil, I used the rest to treat the gas. It did not solve the miss and the tractor continued to smoke the same.
I also tried Mystery Oil both in oil and gas. It seems to make the tractor smoke different (more but different smell and consistency).
As for results, I will say that when I inspected the plugs, cylinder 1 had plenty of crud around the tip so I am not sure if that was a result of the SeaFoam (which was in much longer) but I expect yes. Here is a picture of the spark plug...
 So I plan on servicing the block and ordering an engine rebuild kit depending on what I find in there.
At the same time I plan on welding up a bumper and brush guard for the front. A very small oak tree leaned against the grill after I backed over it and nudged my grill and radiator, pushing the radiator into the fan blades. I have been so careful not to drive forward over anything but this proves that when clearing brush with a tractor, anything can happen.
The first additive I tried was SeaFoam. Since it only took half the can to treat the oil, I used the rest to treat the gas. It did not solve the miss and the tractor continued to smoke the same.
I also tried Mystery Oil both in oil and gas. It seems to make the tractor smoke different (more but different smell and consistency).
As for results, I will say that when I inspected the plugs, cylinder 1 had plenty of crud around the tip so I am not sure if that was a result of the SeaFoam (which was in much longer) but I expect yes. Here is a picture of the spark plug...

At the same time I plan on welding up a bumper and brush guard for the front. A very small oak tree leaned against the grill after I backed over it and nudged my grill and radiator, pushing the radiator into the fan blades. I have been so careful not to drive forward over anything but this proves that when clearing brush with a tractor, anything can happen.
Monday, September 5, 2011
Hood, Front Fenders and Grill...
Today was a roller coaster of a day. We will start with my mission to add an inline fuel filter (knowing that the gas tank still has rust in it) and I have learned that there is no simple way to add a tubing fitting to a flare line. I will have to do some creative thinking to see if I can still manage to add the cheap filter so I can replace them regularly at least until some of the rust works its way out of the tank.
Next I spent Sunday trying to repair the severely rusted front fenders. I wet sanded the hood after the rain fiasco. I got everything ready for a coat of paint Monday morning and was hoping for assembly Monday night. All did not go as planned. After wet sanding I cleaned the hood with a degreaser as recommended by the person behind the paint counter where I bought all the paint. This was a mistake. I should have wiped it down with Acetone like I usually do. After a few swipes down the hood I noticed some really bad fish-eye finish. I grabbed a rag and soaked it in Acetone and cleaned all the fresh paint off. I wiped down the other areas I sanded and painted the hood for a second coat. The fenders turned out as well as expected since I didn’t make them perfect. I had a feeling they would get beat up someday, I didn’t realize it would be today. Nothing seemed to fit so it took some beating and bending to get the front fenders to match up with the grill. Of course I was then missing a critical pin on those fenders to fit into the grill. I made it work with a bolt tightened into the grill and decided I would put a hole in the fender side to receive the bolt. I welded a nut to the outside fender (good bye paint finish) and assembled most of the parts.
Here is where the 1948 Ford 8n sits. The fenders line up pretty well with the brackets on the front but the radiator cap would not fit. I have added 2 layers of a high density rubber but it is still not setting the radiator high enough to clear the top of the hood. I will need to add some spacers and buy some longer carriage bolts to mount. The hood and fenders are sitting off to the side until I can get some spacers and raise the radiator. I will hit the parts place and pick up some new steel fuel line and make some pretty bends up and over the engine to the sediment bowl.
Monday, August 22, 2011
Reassemble and Ride...
More progress on the 1948 Ford 8N this past weekend. Saturday I spent the morning at Acme in Sanford picking up some fasteners to replace the severely rusted ones I removed with Vise-Grips. After spending $6 on a bag full of stainless fasteners and some steel, I began assembling all the cleaned and painted parts. I mounted the new radiator, attached the dash plate and console. I attached the battery box and made a wood bottom to set the battery on. I may make a rubber one later but since I had a scrap piece of thin plywood almost already cut to size I decided that would work and I placed an old battery I had for the boat in there.
Saturday was also spent putting the starter back together. A few lessons learned: Make sure you press the bushing in far enough that it doesn't rub on the grooves in the starter shaft. Since my rear plate (think rear of tractor) had a crack I tried to press the bushing into the good half. I had to press it in more to make it clear those grooves to it ended up in about the middle. If you have the right sized bushing and your plate it not damaged you would press the bushing to the outside edge. After clearing that up we had one operational starter. Too bad the starter solenoid was bad so that would have to wait until Sunday.
I drained and replaced the oil with 20w50. I put in the new oil filter. I drained and added the 90w Mineral Oil I purchased from NAPA to the transmission. I installed the radiator and hoses (putting a thin coat of Teflon pipe compound to keep them from rusting more) an used some new all stainless pipe clamps. I filled the radiator with Anti-freeze and distilled water.
We attached a temporary tank to the dash and hooked up the fuel line. My dad and I hot-wired the starter and cranked it up. We ran it much longer than last time so it had a chance to warm up. The flat head 4 cylinder has a unique sound to it especially when there is no exhaust pipe.
Sunday I attached the air cleaner, attached the new starter solenoid from a 1970's ford. I think the original should be a 3 pole but mine is a 4 pole. I will add another page talking about wiring the tractor later. We wired in the new key ignition and the push button. Once everything was ready we attached the temporary gas tank again and started it up. This was the first chance I had to drive it so it was time for a road test.
We first adjusted the carburetor now that it had an air cleaner to give proper airflow resistance. I may also add another page talking about carb adjustment later. I put it in gear and pulled out of the shop. Under load it sputtered a lot so we continued with adjustments. Eventually it ran pretty good. I tried all the gears and pulled it up the hill. I will say that 4th gear really moves compared to the others. It is definitely a "get home for supper" gear. It did smoke once it got warmed up and the oil got thin. I will probably first try some Seafoam as I have read a few posts saying in some cases it works to help clean and free sticky rings. I will also check compression to see if any of the cylinders are real bad.
That's it for now. Next I need to work on fixing the front fenders to support my hood. So stay tuned...
Saturday was also spent putting the starter back together. A few lessons learned: Make sure you press the bushing in far enough that it doesn't rub on the grooves in the starter shaft. Since my rear plate (think rear of tractor) had a crack I tried to press the bushing into the good half. I had to press it in more to make it clear those grooves to it ended up in about the middle. If you have the right sized bushing and your plate it not damaged you would press the bushing to the outside edge. After clearing that up we had one operational starter. Too bad the starter solenoid was bad so that would have to wait until Sunday.
I drained and replaced the oil with 20w50. I put in the new oil filter. I drained and added the 90w Mineral Oil I purchased from NAPA to the transmission. I installed the radiator and hoses (putting a thin coat of Teflon pipe compound to keep them from rusting more) an used some new all stainless pipe clamps. I filled the radiator with Anti-freeze and distilled water.
We attached a temporary tank to the dash and hooked up the fuel line. My dad and I hot-wired the starter and cranked it up. We ran it much longer than last time so it had a chance to warm up. The flat head 4 cylinder has a unique sound to it especially when there is no exhaust pipe.
Sunday I attached the air cleaner, attached the new starter solenoid from a 1970's ford. I think the original should be a 3 pole but mine is a 4 pole. I will add another page talking about wiring the tractor later. We wired in the new key ignition and the push button. Once everything was ready we attached the temporary gas tank again and started it up. This was the first chance I had to drive it so it was time for a road test.
We first adjusted the carburetor now that it had an air cleaner to give proper airflow resistance. I may also add another page talking about carb adjustment later. I put it in gear and pulled out of the shop. Under load it sputtered a lot so we continued with adjustments. Eventually it ran pretty good. I tried all the gears and pulled it up the hill. I will say that 4th gear really moves compared to the others. It is definitely a "get home for supper" gear. It did smoke once it got warmed up and the oil got thin. I will probably first try some Seafoam as I have read a few posts saying in some cases it works to help clean and free sticky rings. I will also check compression to see if any of the cylinders are real bad.
That's it for now. Next I need to work on fixing the front fenders to support my hood. So stay tuned...
Monday, August 15, 2011
Painting Gone Bad...
This weekend was a busy weekend for the 1948 Ford 8N, tons of prep and painting. All of my parts arrived, one large box at a time. The hood was here early and the grill, radiator and rest followed. During the week I picked up some paint from a local paint shop. I purchased an epoxy primer and I believe a polyester 2 part gray for the hood. Since I had already exceeded my budget the red paint I chose is a much lower quality than the gray. Because of that I decided to paint the gas tank in the gray. Saturday I finished some body work and prepped all the surfaces for priming. Saturday afternoon I shot some primer on the hood, grill, gas tank, and spot primed the radiator. The rain held out despite some dark clouds but the humidity was a little high.
Sunday was different. We rolled out the tractor and I cleaned basically the clutch housing and all the surfaces I will be covering up with parts (battery box and dash) and applied some phosphoric acid to all the rusted surfaces. I also readied the fan and radiator mounts since they were accessible. Then I mixed the good paint. I have never sprayed a high quality paint so I will admit there was a learning curve. I sprayed the inside of the hood (very heavy along the bottom rail since it was not easy to hit). One side of the gas tank looked great as did one side of the grill. Then on to the top of the hood since some dark clouds were rolling in (which were not there 10 mins ago). I hustled on the hood and payed the price. Two runs and one was right on the top ridge. I knew I needed to hurry so I rolled it flat knowing it would probably leave marks on the bottom rails. I sprayed the rest of the top and as I made the final 2 passes drops began to fall from the sky. In the coming weeks I will be wet sanding and applying a second coat to the hood since mother nature needed to sprinkle for a few minutes.
After the rain cleared the sun came back out and so I primed the tractor body section and a few other parts. Let that dry for about 15-30 mins per the instructions and then sprayed the red. The fenders even got a coat of primer since I overshot the mix by a few ounces.

I also took apart the starter and found that the brushes were hardly worn. The bushing was not in the front plate and I suspect that it was the reason for the locked up condition when we brought the tractor home (pinned in the flywheel). I am heading to a bearing shop this week to see if I can pick up a new one to press in while I have it torn apart. Some new grease and hopefully next weekend we can start putting things back on.


Sunday was different. We rolled out the tractor and I cleaned basically the clutch housing and all the surfaces I will be covering up with parts (battery box and dash) and applied some phosphoric acid to all the rusted surfaces. I also readied the fan and radiator mounts since they were accessible. Then I mixed the good paint. I have never sprayed a high quality paint so I will admit there was a learning curve. I sprayed the inside of the hood (very heavy along the bottom rail since it was not easy to hit). One side of the gas tank looked great as did one side of the grill. Then on to the top of the hood since some dark clouds were rolling in (which were not there 10 mins ago). I hustled on the hood and payed the price. Two runs and one was right on the top ridge. I knew I needed to hurry so I rolled it flat knowing it would probably leave marks on the bottom rails. I sprayed the rest of the top and as I made the final 2 passes drops began to fall from the sky. In the coming weeks I will be wet sanding and applying a second coat to the hood since mother nature needed to sprinkle for a few minutes.
After the rain cleared the sun came back out and so I primed the tractor body section and a few other parts. Let that dry for about 15-30 mins per the instructions and then sprayed the red. The fenders even got a coat of primer since I overshot the mix by a few ounces.
 |
 |
| Aftermarket Hood |

 |
| Ford 8N Dash |
 |
| Ford 8N Seat |


Wednesday, August 3, 2011
Ordering Parts...
So I ordered some parts last night and I should be heading to Apopka, FL today to pickup and order a few more.
I ordered a radiator and hoses, hood and starter rebuild kit from http://www.ytmag.com/parts/
I am heading to pick up the rest of the parts I need from http://www.dmtractorparts.com/
This weekend I will probably get into some bodywork, cleaning and painting. I just wanted to post those links for anyone shopping for 8n Parts.
I ordered a radiator and hoses, hood and starter rebuild kit from http://www.ytmag.com/parts/
I am heading to pick up the rest of the parts I need from http://www.dmtractorparts.com/
This weekend I will probably get into some bodywork, cleaning and painting. I just wanted to post those links for anyone shopping for 8n Parts.
Sunday, July 31, 2011
Steering and Shifting Problems Under Control
This weekend we continued to work on the 1948 8n although now it has become a mixture of '48 and '52. Dad had a 1952 he picked up for parts to keep his '51 running. It was time to salvage from the old boy. I checked the radiator but it's got too many holes in it. I also need the hood but you will have to wait for some pics of that beauty. I torn down much of the '52 and put my '48 parts back to replace what I borrowed.
The steering box on the '48 was in bad shape, there was way too much up and down play in the steering shaft. Steering felt tight on the '52 so it was spoken for.
 A trick I read online came in handy. Remove all the bolts holding the housing in place. Then to remove the ball joins connected to the pitman arms, place a wood block behind the pitman arm where the threaded nut goes. Grab a large hammer and give the pitman arm a few whacks at the joint. This pushes the pitman arm towards the tractor and pops the ball join out using the treads. After a little cleaning and primer and red paint it looks pretty sharp.
Next it was time to address the shifter problem. The shifter pin was sheered off so the shifter spun in the socket. If you recall from the previous post my complaints about finding 4th gear, this was part of the problem. So I removed the cover and all from the '52. Here I checked the neutral safety switch and it didn't seem to work consistently. In the end my cover was in the best shape so I swapped out the shift lever and starter button. Cleaned and painted both and here is the progress so far...
 No that is not "Factory Ford Red" but since this will be a workhorse I am not worried about it. Now it's time to make a parts list. I need a few odds and ends but for the most part the '48 is coming together. It might be a few weekends before I get all the parts ordered and delivered so stay tuned.
Until next time...
The steering box on the '48 was in bad shape, there was way too much up and down play in the steering shaft. Steering felt tight on the '52 so it was spoken for.

Next it was time to address the shifter problem. The shifter pin was sheered off so the shifter spun in the socket. If you recall from the previous post my complaints about finding 4th gear, this was part of the problem. So I removed the cover and all from the '52. Here I checked the neutral safety switch and it didn't seem to work consistently. In the end my cover was in the best shape so I swapped out the shift lever and starter button. Cleaned and painted both and here is the progress so far...

Until next time...
Saturday, July 30, 2011
My Wife's First Impression
Saturday was the first time my wife has seen the tractor. I think she's happy I have a project and has seen me work on things before so her imagination has been prepared for projects like this. I still have a feeling that she was not impressed. Whats worse is that she met the '48 after I had removed many of the parts. I felt it necessary to inform her that many of the parts were scattered around the shop area so I had actually purchased more tractor than she saw.
Monday, July 25, 2011
It's alive...IT'S ALIVE!
Sunday was our first attempt at making the ’48 run. Let's start by examining the current state. As promised here are a few pics...


We started by removing starter since that was not working. As I have read, it was essential to remove the oil filter housing to get proper clearance for the starter. It was also not easy to get it to clear the valve for draining the water from the block.
Here are a few things we removed:
- Generator
- Air filter
- Homemade hood
- Gas tank
- Voltage regulator (no longer will be needed)
- And the old wiring harness (most of which was not being used)
- Pulled the spark plugs to inspect
- Removed frequently damaged and repaired original front bumper
- Radiator and hoses
Finally we got down to business. Using another running 8n (’51 I believe) we pulled it in the field to see what was happening. Pulled the plugs and checked for spark. None was present. Towed it back and cleaned the points and built a homemade crank for it. Replaced some wiring and rewired a switch as the kill switch. Cranked it over by hand and “bang” plenty of spark now. Poured some gas down the fuel line and filled the bowl and took it back to the field. Put it in 4th (which is not as easy as one might think but we’ll cover that another day). After a few sputters and some playing with the choke, it fired up. I let it run for a few seconds and I hit the switch to cut it and we towed it back.
I feel great since the engine should be in good working order and shouldn’t take much work. The plan is to start picking up the bare essentials to get it to a working condition (radiator, starter rebuild kit…) and then eventually save up for the engine rebuild kit.
Here is how she sits at end of this weekend...

Here is how she sits at end of this weekend...

Well, until next time…
Tuesday, July 19, 2011
And so it begins...
Yesterday evening I picked up my newly acquired 1948 Ford 8N Tractor. I picked it up in Oak Hill, FL for $350. I am the third owner, and was handed the original owners manual and sales invoice. The tractor was purchased October 7th 1948 for a purchase price of $1,320. Below are pictures from the posting on Craigslist, since it was dark when we arrived home I do not have any better pictures yet. Those will come soon. The bush hog pictured did not come with it.


Subscribe to:
Posts (Atom)